
eZwayZ administrator’s manual
Logging in
1.1 Logging in to the eZwayZ portal
Go to: https://portal.ezwayz.com
Enter the login details you received from us and select the location you want. You will now go to the building management section of your building.
1.2 Lost or changing your password
If you have lost your password or want to change it, click Forgot password? Enter your email address and you will be sent a link with which you can change your password.
1.3 Requesting login details
Have you not received any login details? Then get in touch with us.: support@ezwayz.com.
1.4 Work in the portal
The portal runs on software from NavVis. After an update, the portal looks different. In this chapter, you will read where to find everything.
1.5 The toolbar on the left-hand side
In the toolbar on the left-hand side/top, you will find these tools:
Mark & Measure. With this, you measure distances and mark points in the model.
POI types. Here you create categories and icons. See chapter 3.
Verification.
Crop view. With this, you show part of the model, so that you can see better..
Crop & Download. With this, you download part of the model.
1.6 Edit site: Make changes in a draft
Do you want to change something in the model, the floors or the Navigation Graph? Then first click Edit site in the top bar.
You are now working in a draft. A draft is a concept version. Users of the app cannot see your changes yet. Are you finished? Then publish the draft. Only then will you see the changes in the app.
1.7 Opening modules
Next to the Edit site button is the button for modules. Click it and choose NaviGuide. You can now choose from:
Welcome information. The welcome information for your location. See chapter 6.
Museum Content. Information on a POI. See chapter 9.
NaviZones. Areas with a name and notifications. See chapter 5.
NaviPoints. Notifications at a fixed location. See chapter 4.
Tours. Tours past POIs. See chapter 10.
NaviLines.
Navi Vertical Connections. Connections between floors, such as stairs and lifts. See 5.1.2.
Settings. Settings for the app at your location. See chapter 7.
Museum Content, Tours and NaviLines You only see this if this module is switched on for your location.
In the manual, we write it like this: Modules > NaviGuide > NaviZones.
1.8 Switching between 2D and 3D
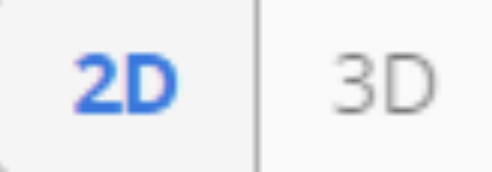
With the 2D and 3D buttons in the middle of the window, you switch between the floor plan and the 3D view. Click the small arrow next to these buttons for other views and styles. Here you can switch on the PointCloud, for example. This is a view of the building made up of millions of small points from the scan.
The buttons for editing the map are next to the zoom buttons.
1.9 Back to the portal
With the Leave to portal button in the top bar, you go back to the overview of the portal.
2. CREATING WALKING ROUTES WITH THE NAVIGATION GRAPH
The Navigation Graph (abbreviated to NavGraph) is used to generate walking routes. These routes are shown inside a building with green nodes and yellow edges. This technique is used to guide the end user from point to point. The nodes are connected to each other, so that the system can calculate the fastest route to the desired POI. The NavGraph detects stairs and lifts by placing nodes vertically or diagonally and connecting them to each other.
Is there no NavGraph for the building yet? Then follow the steps in 2.1. Is there already a NavGraph? Then go straight to 2.2.
Nodes and edges can be generated automatically by the system, but you need to check them and adjust them where necessary.
2.1 Creating a NavGraph
1. Go to Site Setup > Dataset management.
2. Click Advanced at the relevant bundle for which you want to create the NavGraph, and choose Create NavGraph.
3. In this menu, you can also choose to generate the NavGraph again or delete it. Please note! Once you do this, changes cannot be undone.
2.2 Making changes
You adjust walking routes in the 2D floor plan or in the 3D view. First click Edit site. Then choose Navigation Graph.
Click a node. A window opens on the right. Here you connect nodes to each other or delete them. With Change node z-level, you adjust the height of a node. The z-level is the height of a node in relation to the floor.
Important tip: Do not forget to click Save every now and then when you have made changes in the NavGraph. The system does not save changes automatically. Are you finished with all your changes? Then publish the draft. Only then will you see the new walking routes in the app.
2.2.1 Changes in the 2D map
1. Open the Navigation Graph. The floor plan of the building appears, with the nodes and edges that have been placed on it.
2. Click a node in the right-hand window to edit or delete it.
3. When you select 2 nodes, you can connect them to each other by clicking Create edge. Or disconnect them by clicking Delete edge.
4. If two connected nodes are far apart, you can split the line between them by clicking Auto-split edge in the advanced options (Advanced) in the right-hand window.
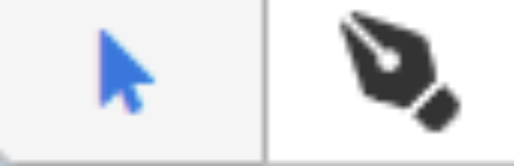
5. With the pen tool, you can quickly create a new node that is directly connected to an existing node.
Arrow tool and pen tool. Switching between 2D and 3D views
2.2.2 Changes in the 3D view
1. You can also view the nodes and edges in the panorama photos. This way, you can clearly see, for example, how nodes on different floors are connected to each other. Click the 3D button in the middle of the window
2. When many nodes have been placed and connected, the overview in the 3D view can become unclear. With the Appearance setting in the right-hand window, you can set the vertical and horizontal radius of visibility.
3. POIS AND (SUB)CATEGORIES
Points of interest, or POIs, and (sub)categories are created via the eZwayZ portal. POIs give structure to landmarks and facilities inside buildings, so that you can navigate to them. Open the toolbar on the left-hand side and open the POI types screen.
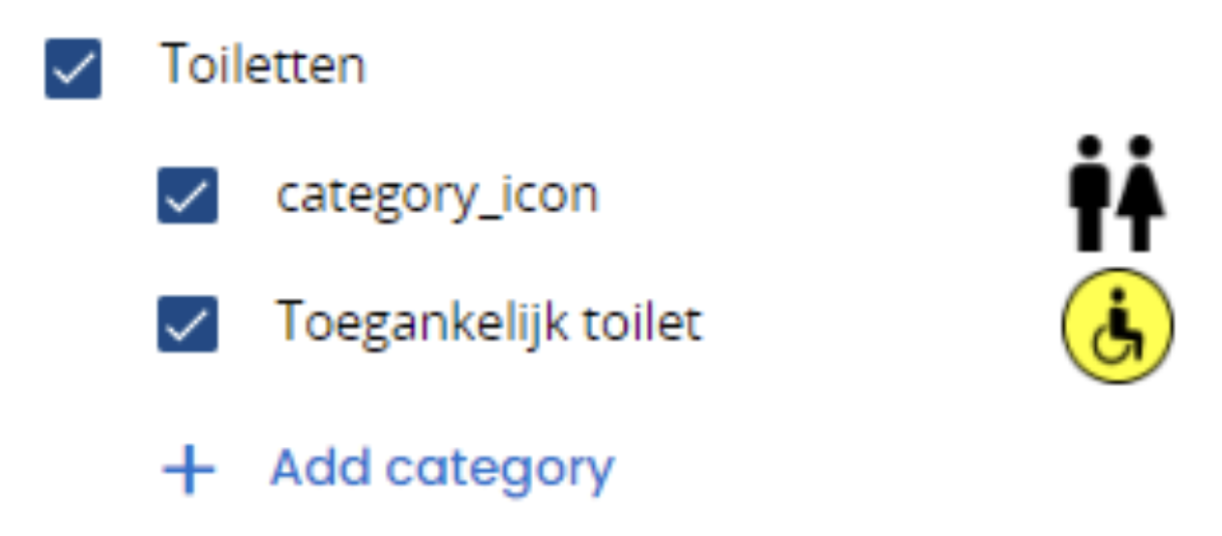
3.1.1 Creating a main category with a main icon
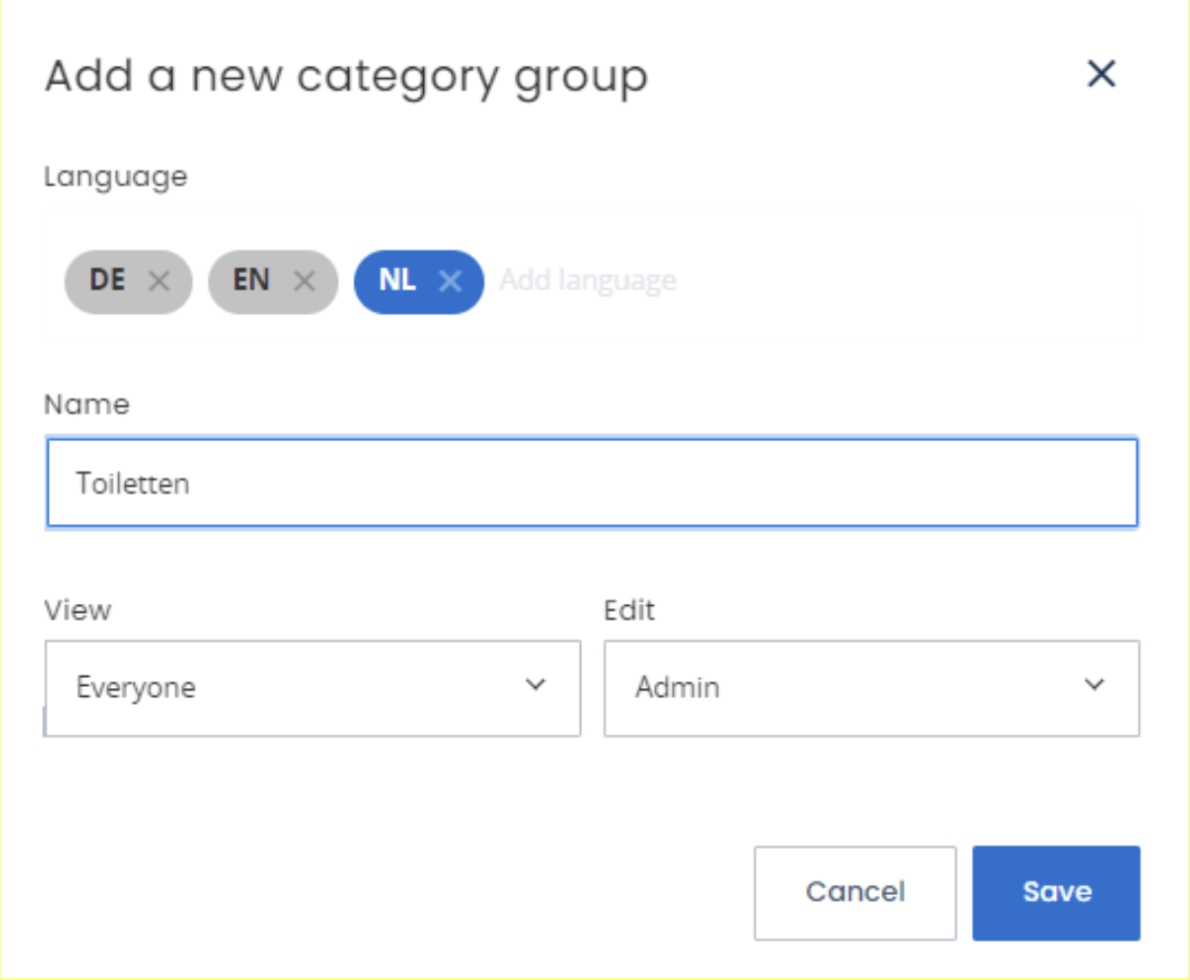
1. Click Add group to create a main category.
2. Give the main category a title, for example: “Toilets”.
3. Add different languages by searching for them in Language, and add a title for each language..
4. Click Save and the main category appears in the left-hand window.
5. Click Add category under the main category you just created.
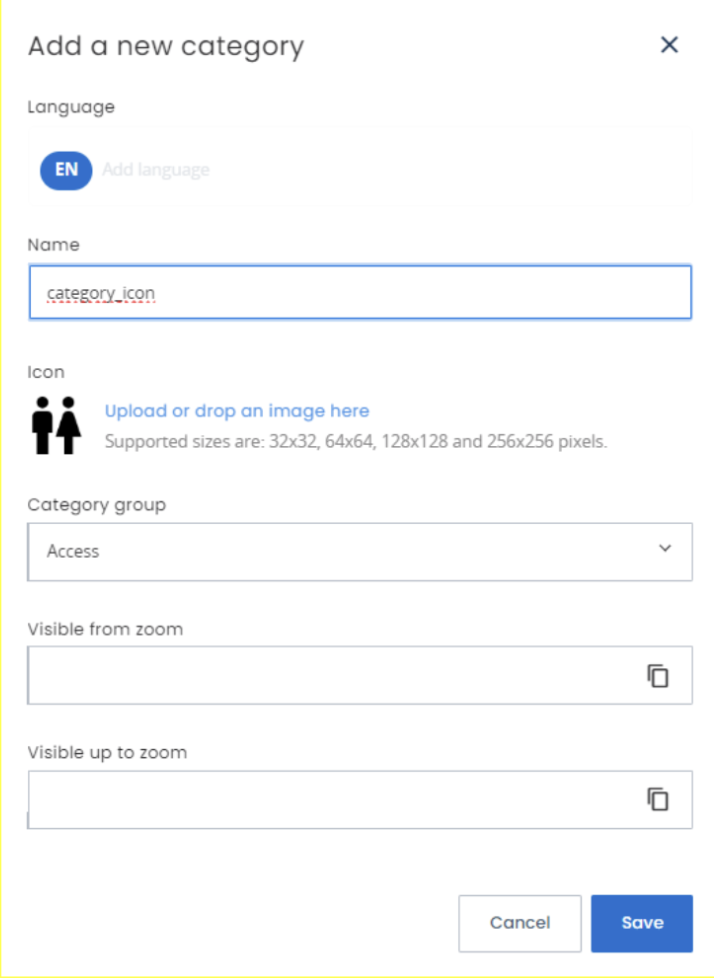
6. Add a black icon. You have received icons from us. If you want to create a new icon, it must have the following properties: it must be a PNG file with a maximum size of 256x256 pixels. This icon is shown with the main category as soon as you open the eZwayZ app.
7.Give the icon the title: category_icon. You do not need to take different languages into account here. Click Save.
+ Add group + Add category
3.1.2 POI Add a selection list
Now that the main category with the matching icon has been added, you can add a selection of POIs, from which you can choose when placing the POIs. The POI selection list can also be used for subcategories. We explain this in 3.3.
1. Click Add category in the relevant main category.
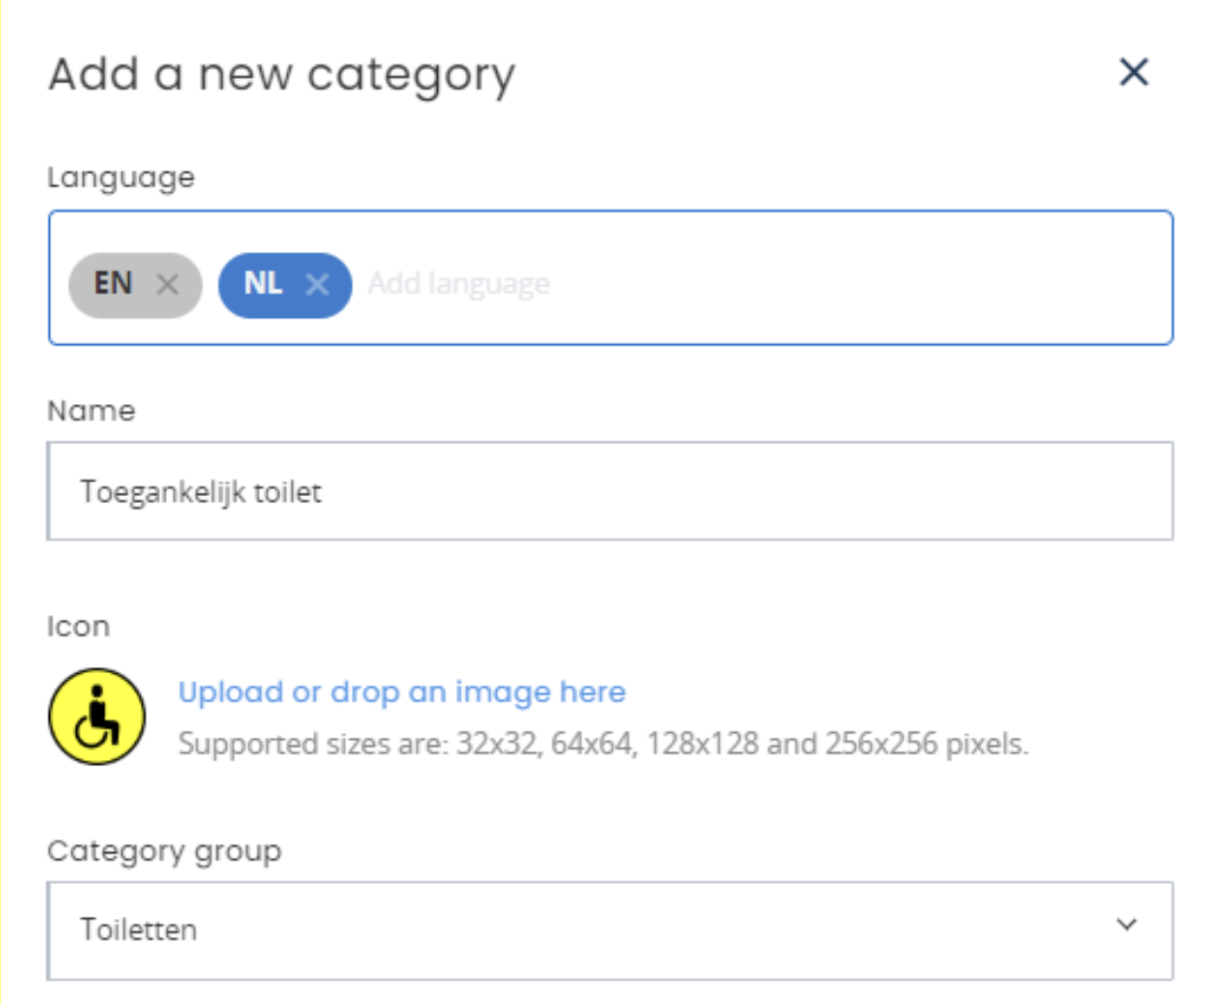
2. Enter a neutral title for the subject for each language. If the main category is Toilets, this could be, for example, Men, Women or Accessible toilet.
3. Add a yellow and black icon provided by eZwayZ. This icon is shown as soon as a POI is placed in the surrounding area.
If you want to create a new icon, it must have the following properties: it must be a PNG file with a maximum size of 256x256 pixels.
1. Click Save.
2. The first item has just been added and can be seen in the left-hand window.
POI list item Overview of the category in the left-hand window
3.1.3 Placing and adjusting POIs
Now that the POI selection has been set up, you can place the POIs in different places in your building. For this, you use the panorama photos.
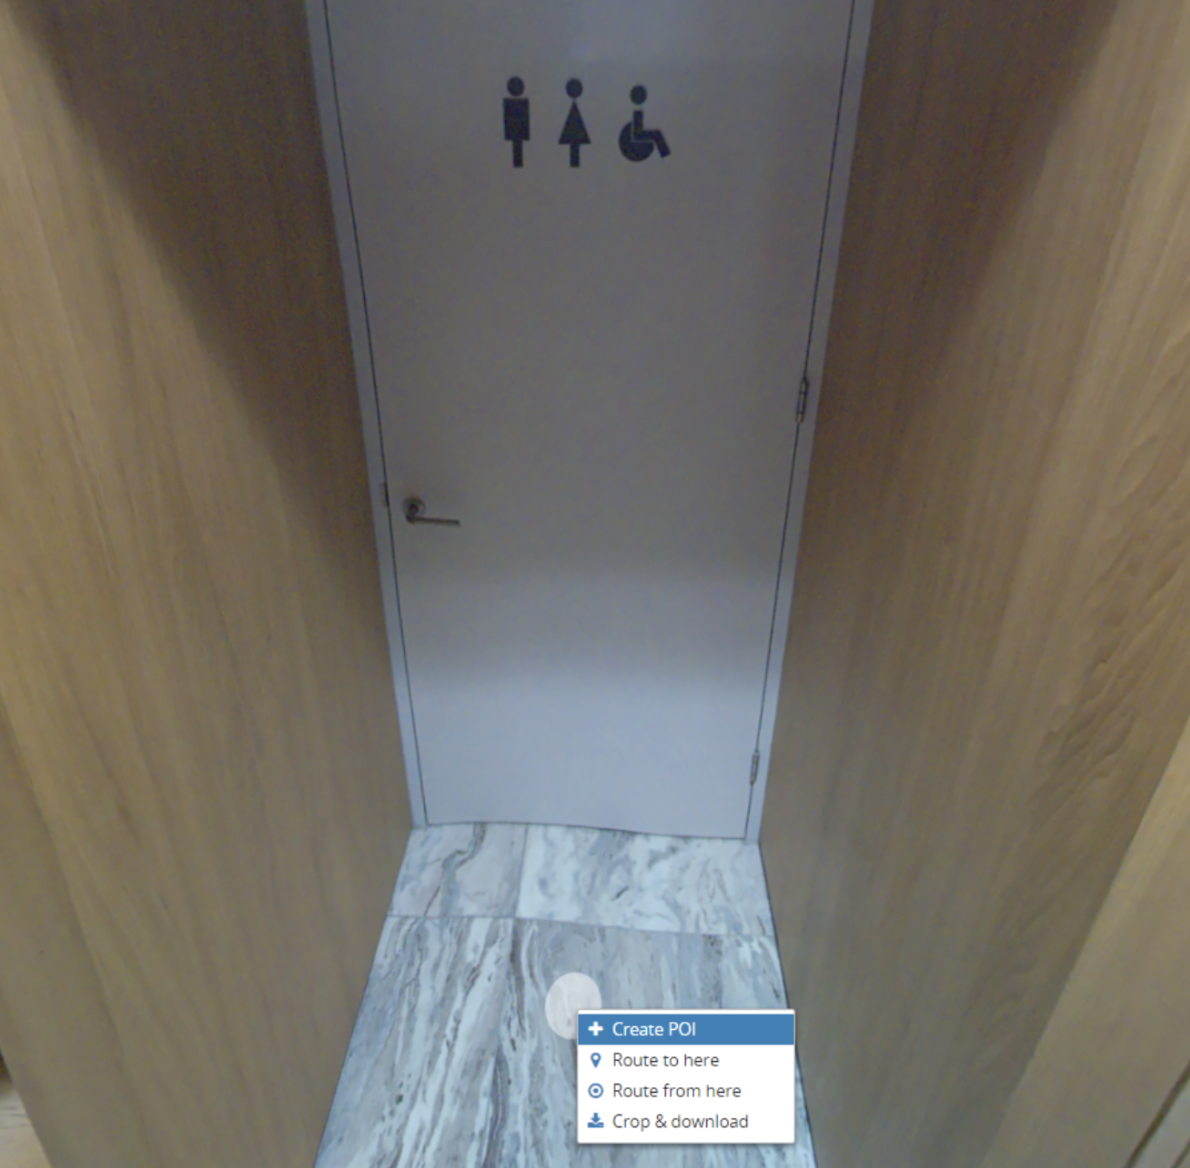
1. Go to a place in the building that users can navigate to, such as the door of the accessible toilet.
2. Right-click on the spot and click Create POI.
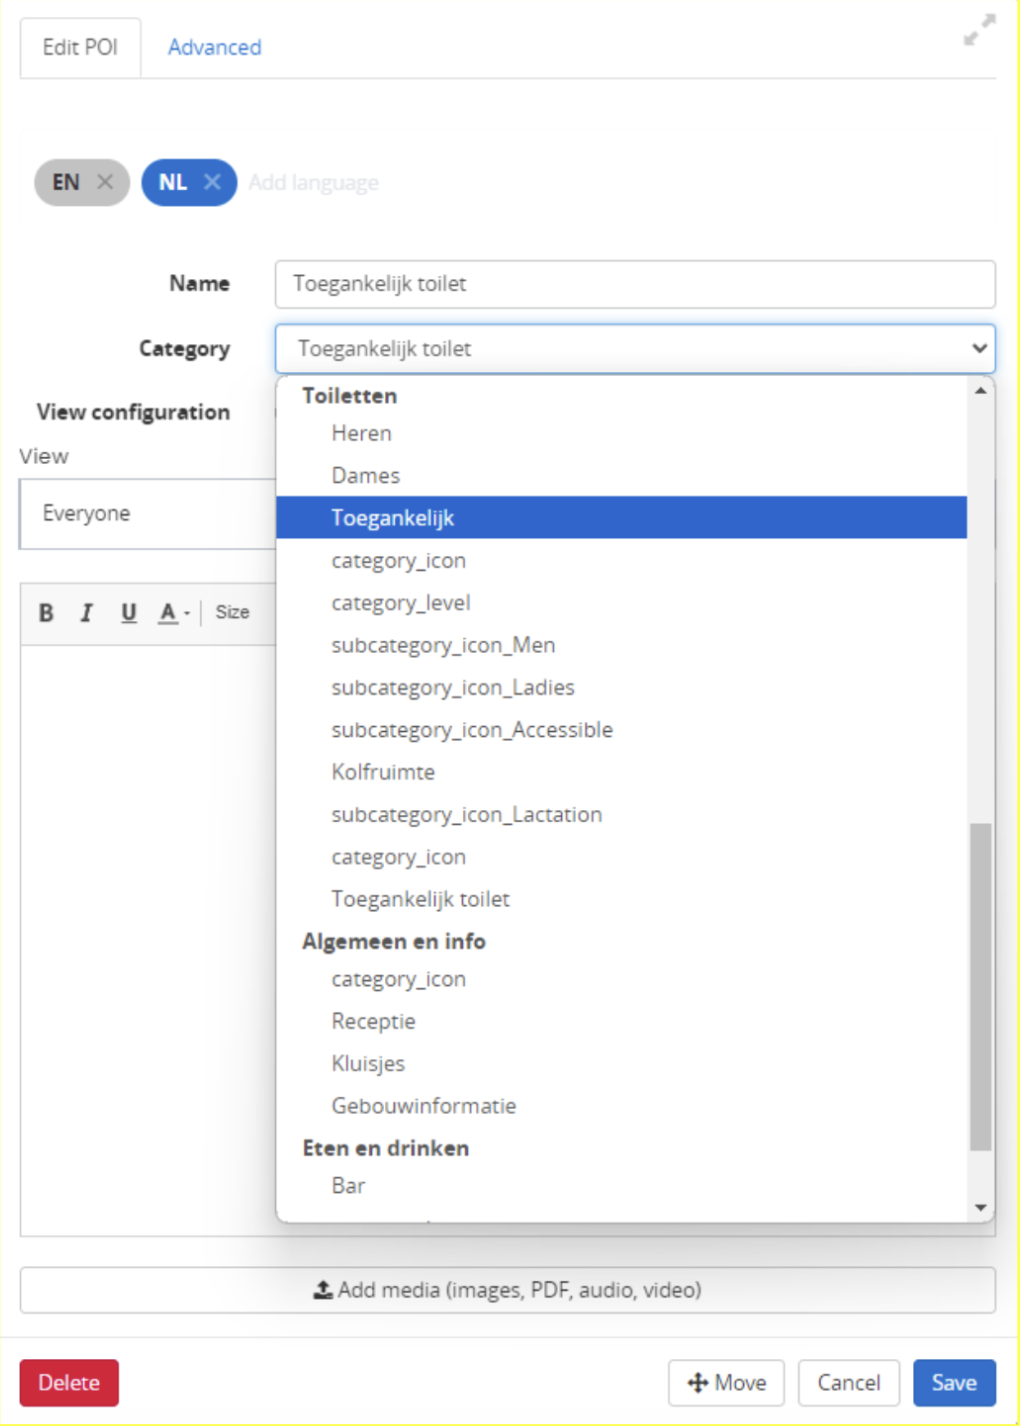
3. Give the POI a title, for example: “Accessible toilet C-Wing”.
4. Place the POI under the right category in Category. In this case, that is Accessible toilet.
5. If you want to use a different icon for a particular POI, you can do this via the Advanced tab. Upload the icon here, and only this POI will be shown with a different icon. You can also remove the icon here again.
6. Click Save and the POI is placed in the surrounding area.
7. By left-clicking the POI, a window appears at the top left. By clicking Edit, you can adjust the POI.
8. By right-clicking the POI, a window with editing options appears. With this, you can, for example, delete the POI, set up a route to it or assign another function, which we cover further on in this document.
Placing a POI Editing a POI
3.2 Setting the order of main categories
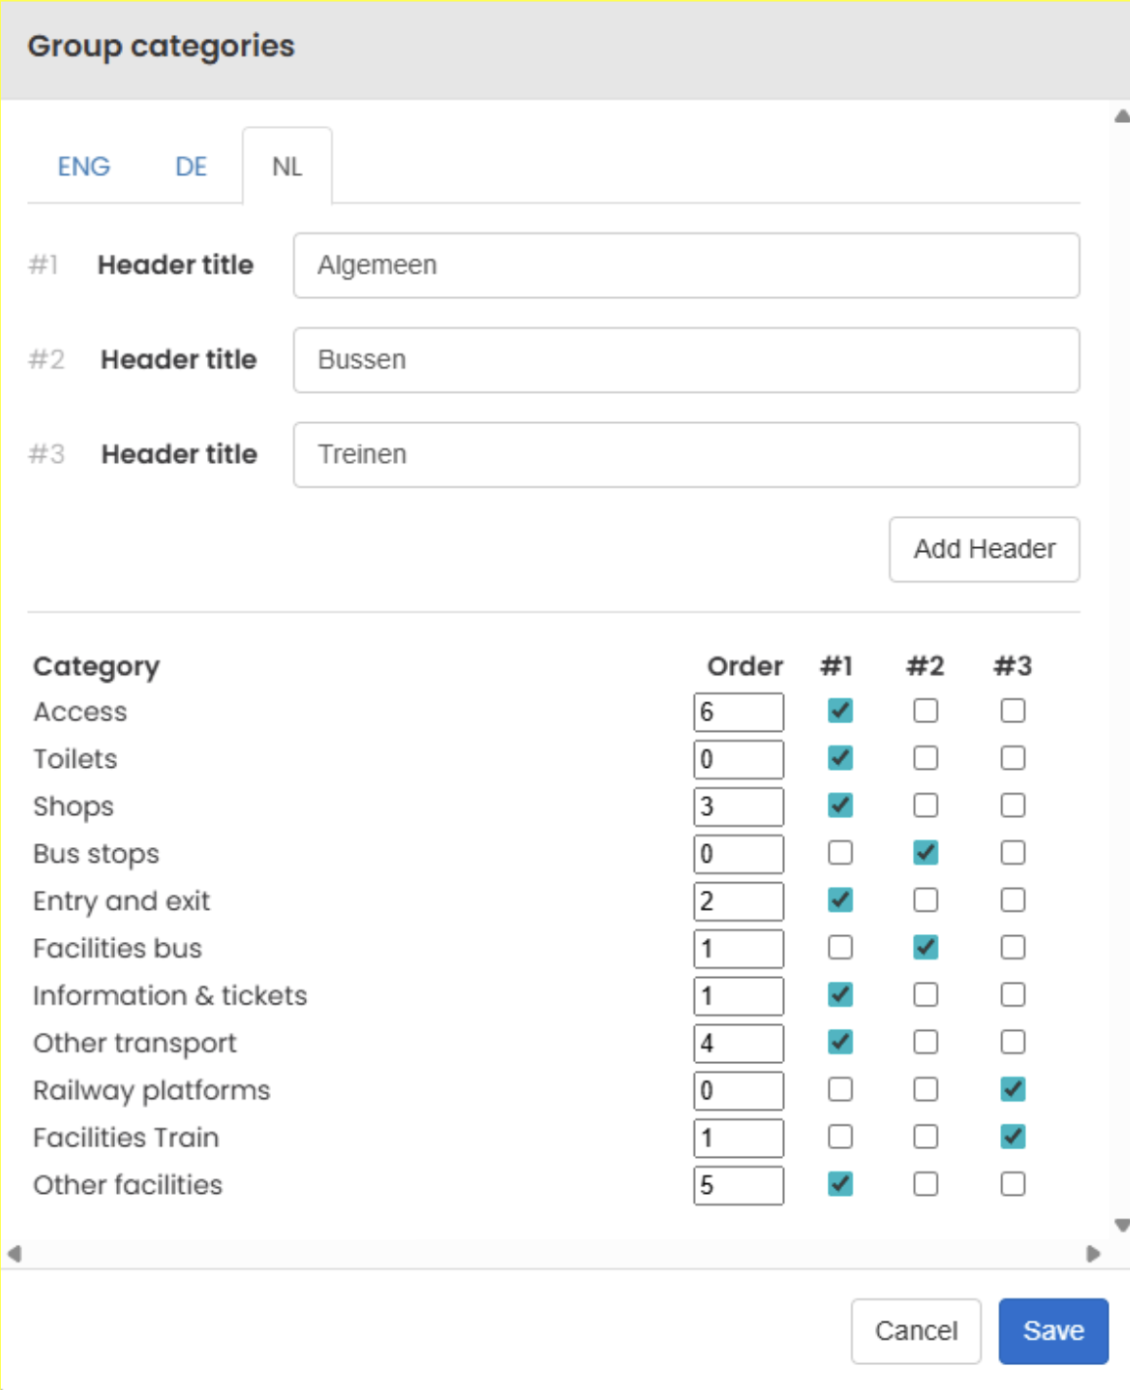
You decide for yourself in which order the main categories appear in the app. You can also divide them under headings, such as “General”, “Buses” or “Trains”.
Open Modules > NaviGuide > Settings.
Tick the box at Group categories and click Save. A pencil appears.
Click the pencil.
Click Add Header to create a heading. Type the name at Header title. Repeat this for each heading.
In the list, tick for each main category which heading it belongs under.
Enter a number at Order. The category with the lowest number is at the top.
Click Save.
3.3 Creating subcategories
3.3.1 Converting the POI selection list to subcategories
As explained earlier, the POI selection list can also function as a subcategory. To assign subcategories, you first create an extra layer in the relevant main category. Click Add category and give it the title: “category_level”. This way, all titles in the POI list are seen as a subcategory. You do not add an icon or languages. Click Save.
3.3.2 Assigning subcategory icons
There are two ways to link icons to the subcategories, namely:
A generic icon for all subcategories
A unique icon for each subcategory.
We discuss them below.
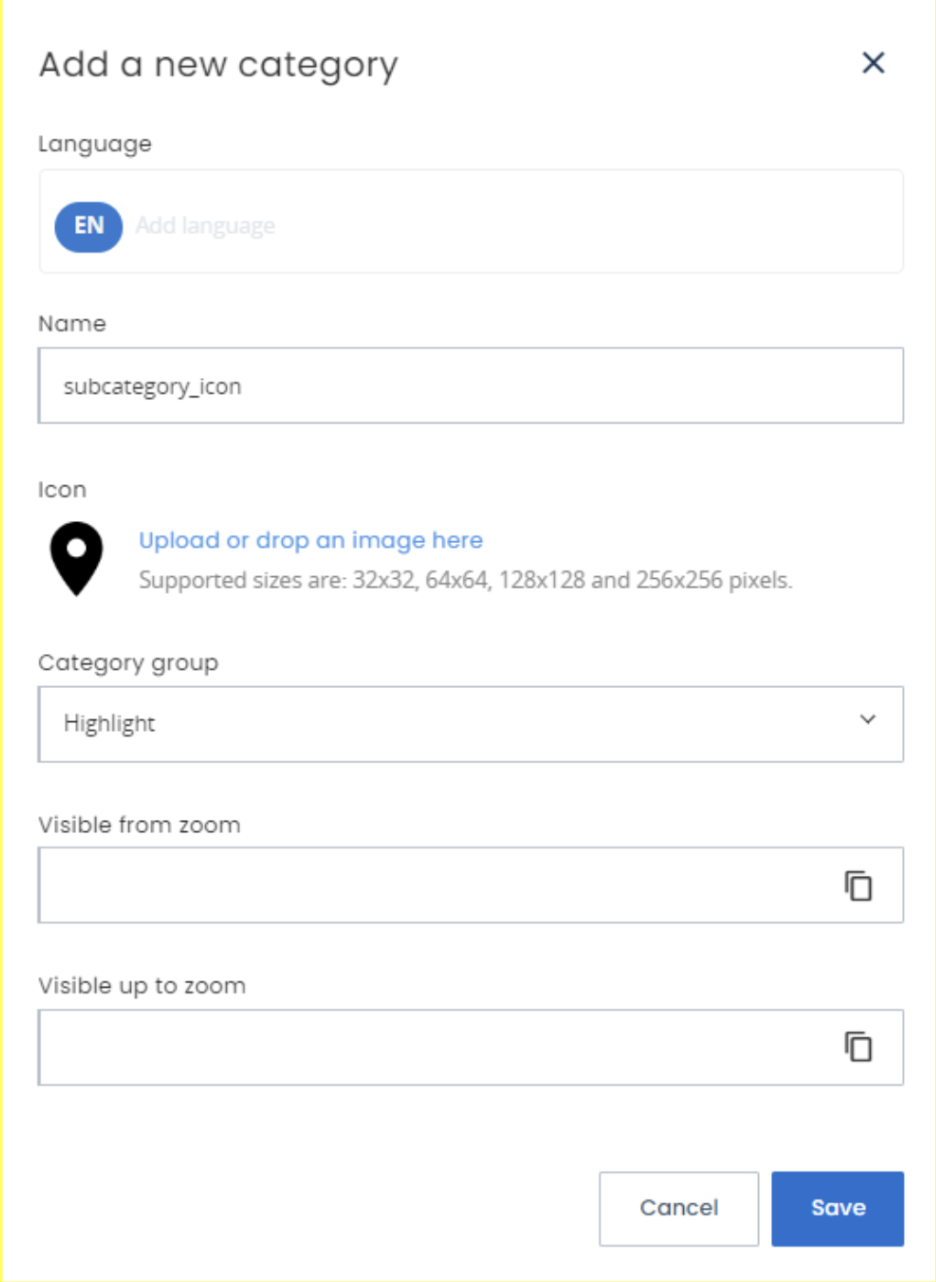
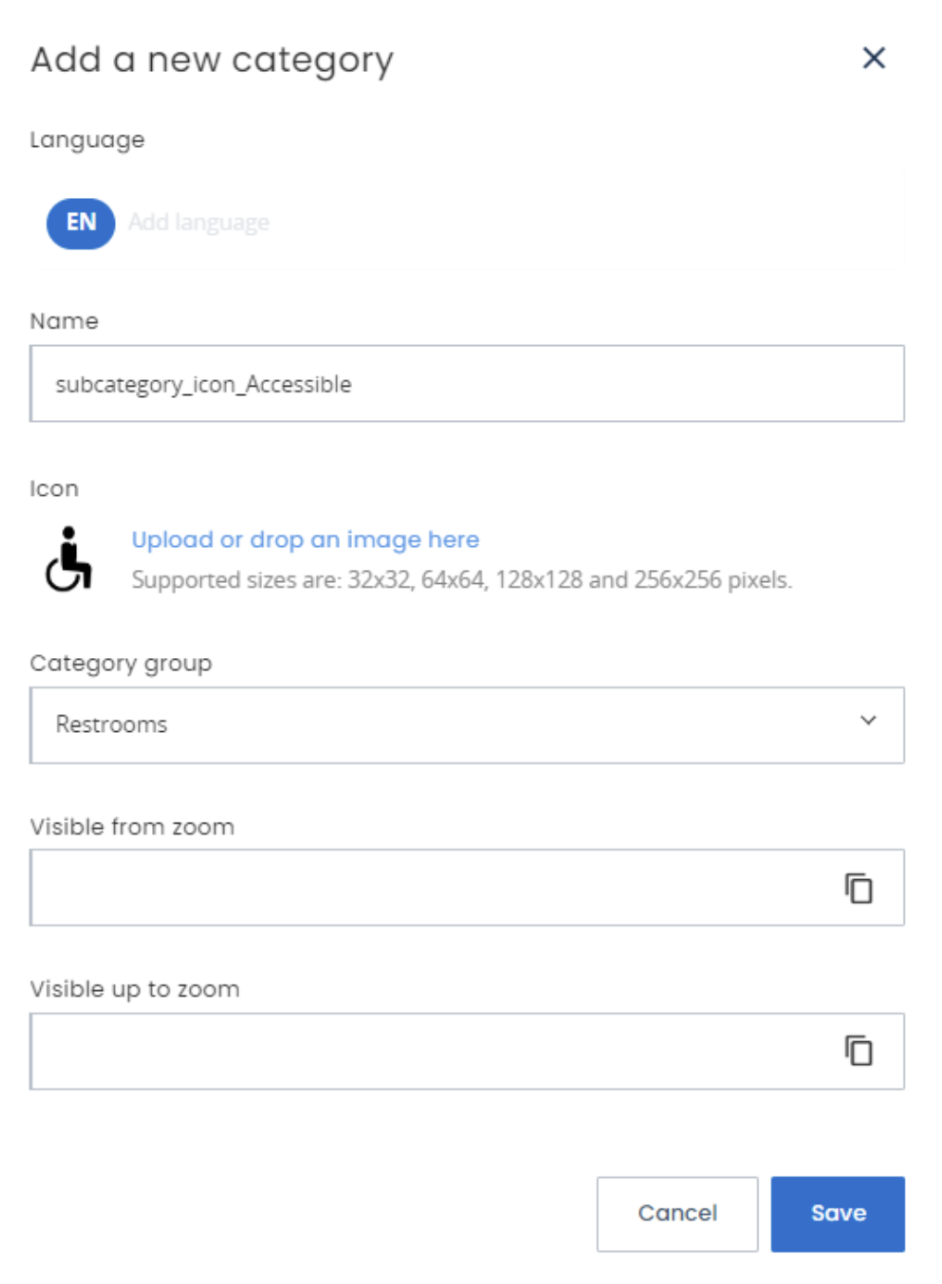
Now that they have been converted, you can create the icon for the subcategory. In the relevant main category, click Add category and give it the title: “subcategory_icon” (generic) or “subcategory_icon_First word of title in POI list” (name-specific). If English translations have been added, it is best to use these. For example: “subcategory_icon_Accessible” or “subcategory_icon_Men”
Please note: If two titles contain the same words, the icon that was entered first is assigned automatically. So make sure that all titles are unique.Add a black icon. This icon is shown as soon as you open the main category in the app. If you want to create a new icon, it must have the following properties: a PNG file with a maximum size of 256x256 pixels.
Click Save and the subcategories with icons have been assigned.
Generic (all subcategories) Name-specific (single subcategory)
4. NAVIPOINTS
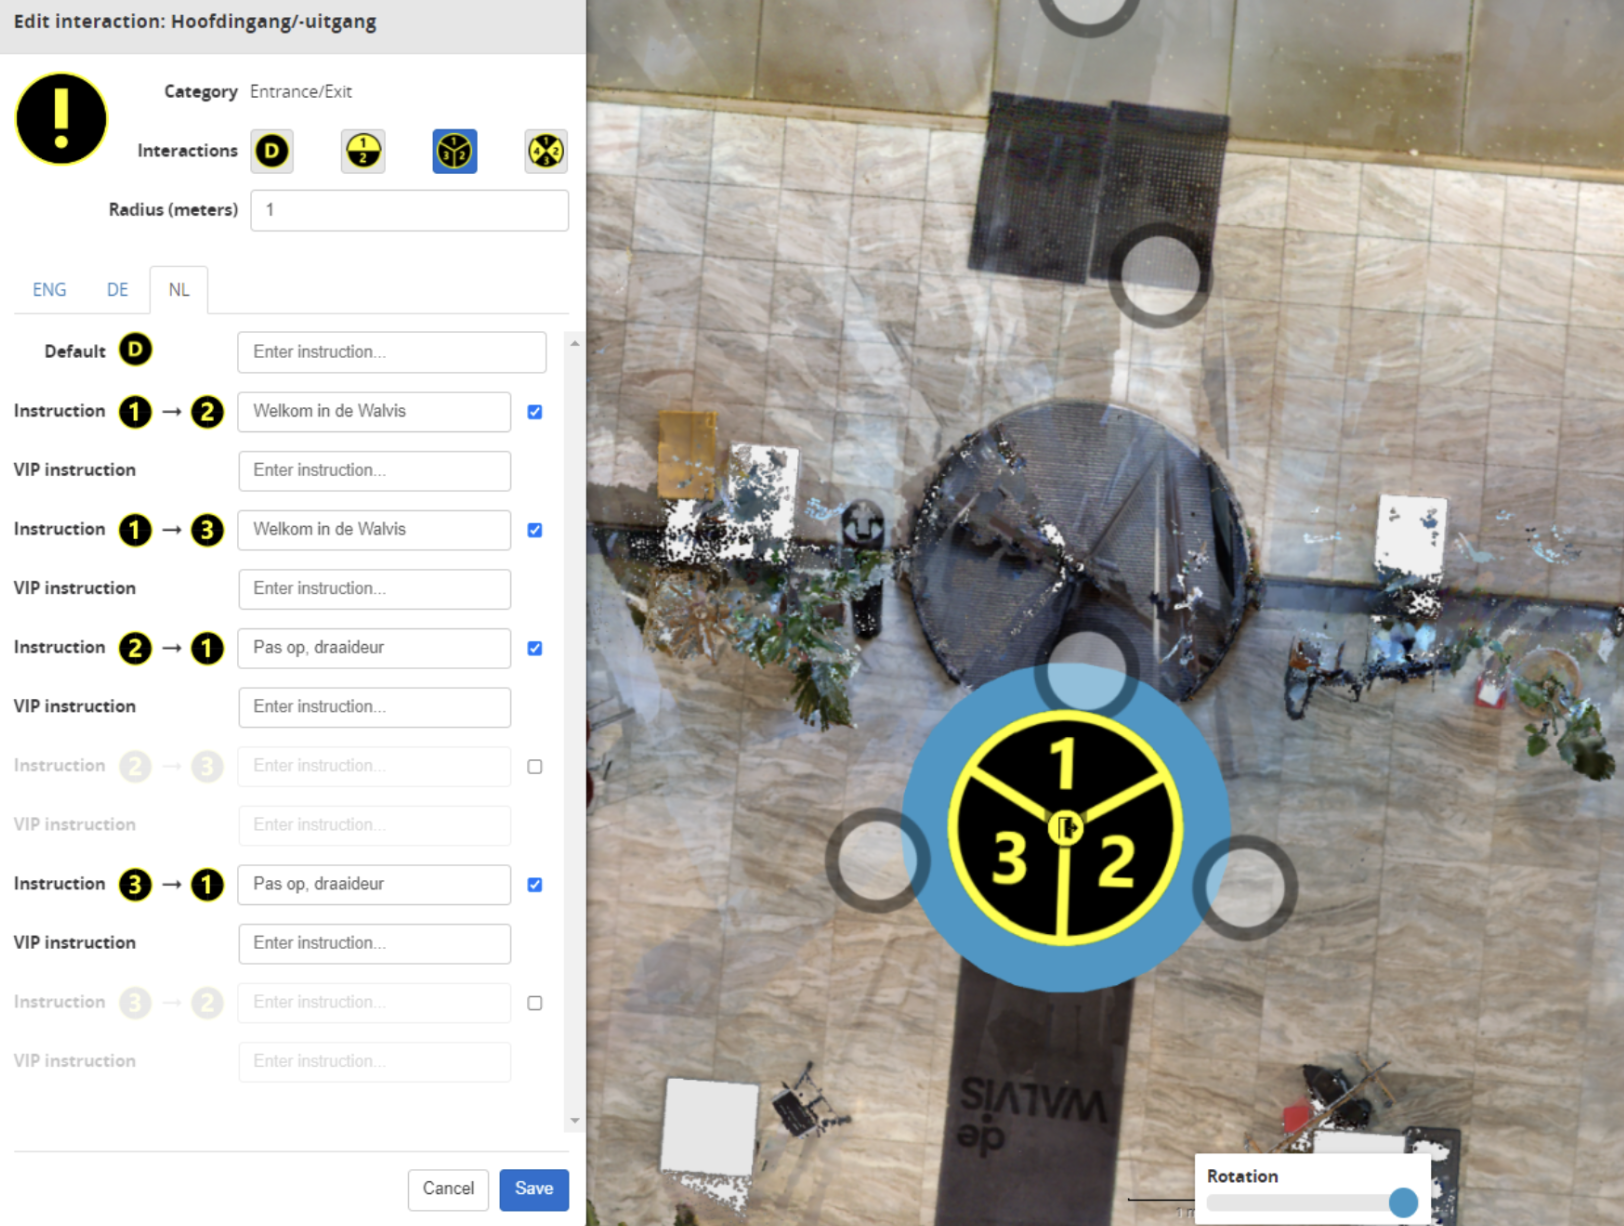
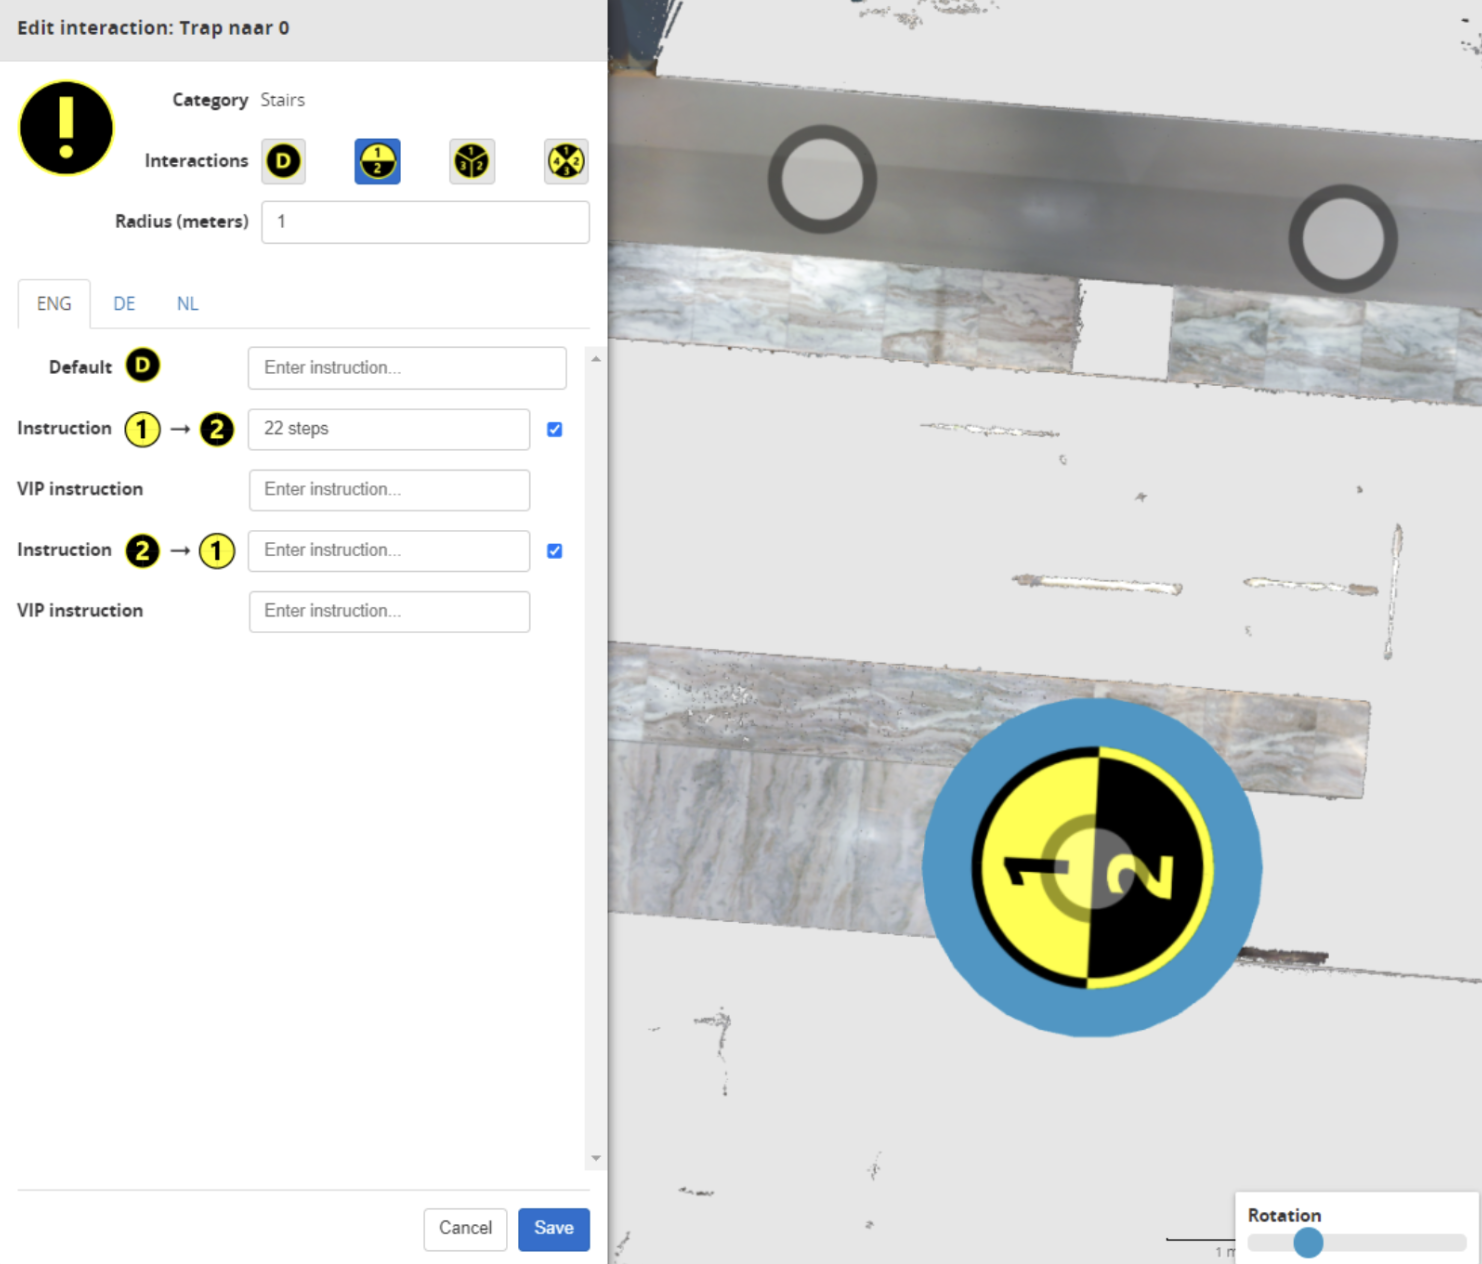
NaviPoints are POIs placed in the surroundings that hold a piece of information and serve different purposes. Originally, they are intended to speak manually entered messages within the radius of the eZwayZ user who is inside the building. They can warn the user about possible hazards (such as tripping hazards or protrusions) or inform them about interactions with facilities (for example the number of steps on a staircase or the position of a button at a lift). While setting up the NaviPoint, you can indicate the exit angle of the direction by moving the slider (at the bottom centre of the screen) from left to right.
4.1 Adding NaviPoints
A NaviPoint can only be converted from existing POIs.
Open Modules > NaviGuide > NaviPoints.
In the left-hand window, you now see all the POIs in the building.
To create a NaviPoint, right-click a POI to which you want to add a message.
Click Create/edit NaviPoint. The POI is converted automatically and a new screen appears..
4.2 Specifying
If necessary, enter a radius of at least 1 metre. As soon as the eZwayZ user comes within this radius, the message is played.
Under the Interactions option, choose the number of directions with which the NaviPoint can interact (default, 2, 3 or 4). With this function, you can choose the available directions of the POI and rotate them with the Rotation slider at the bottom of the screen.
Enter the instruction (this can be done in several languages).
Please note: if several directions are activated, several text fields appear. Activate the direction that you want to make active. As soon as a field is not active or not filled in, no message is spoken from this direction.At Interaction Radius and Reaching Radius, you set at how many metres from the NaviPoint the app gives a notification. Also type the message here. For example: “The information desk is 5 metres ahead.”
Click Save. As soon as the user reaches the NaviPoint, they are informed with the message that you have just created.
Using a NaviPoint at a revolving door Using a NaviPoint at a staircase
5. NAVIZONES
A NaviZone is an area that you draw on the floor plan. You can set it so that the user hears a message when they walk into or out of this area. This way, you can tell someone where they are, for example, or warn them of a hazard.
You use a NaviZone to:
Give an area a name, such as “Central hall”.
Play a message when someone walks into or out of an area.
Give extra control on floors that look very similar. See 5.1.2.
5.1.1 Creating a new NaviZone
Open Modules > NaviGuide > NaviZones.
Click + to create a new zone.
Type a name for the zone. You enter only one name here. You add the translations later.
In the list, you now see a line with the name of your zone and “editing...”. This way, you know which zone you are drawing.
Draw the area on the floor plan. Click on the map for the starting point. Then click on each corner of the area. Finally, click on the starting point again to close the area.
Not happy with it? Click Clear layer and draw the area again.
Give the zone a colour. This helps you keep an overview on the map.
Not sure what a button does? Hold your mouse over it. You will then see a short explanation.
Adding translations and messages
Click Edit details at the zone. Here you will find:
Zone name. The name of the zone. Add the translations here for all the languages of your location.
Zone-in message. The user hears this message when they walk into the zone.
Zone-out message. The user hears this message when they walk out of the zone.
Force call-out (entering). Switch this on if the app should speak the name of the zone when someone walks into the zone, even if there is no Zone-in message.
Please note: the app only says something if you fill in a Zone-in message, or if Force call-out (entering) is switched on. A name alone is not enough.
Fill in each message for all the languages of your location.
Saving
You have two buttons to save with:
Save draft. Your changes are saved and you stay in edit mode. This way, you can keep working.
Save. The portal first asks whether you want to save the changes. After you confirm, the zone is saved and edit mode closes.
Do not forget to publish the draft afterwards. Only then will users hear your messages in the app.
Tips for good messages
Your messages are read aloud to people with a visual impairment. So keep these tips in mind:
Keep it short. One message per notification.
Start with the most important thing. For example: “Caution, stairs down, 5 steps.”
Mention distance and direction where it helps. For example: “Lift on your right-hand side.”
Do not use a colour or a sign as the only landmark. This is of no use to someone who cannot see
Read your message aloud. Does it sound clear? Then it is good.
5.1.2 Floors that look alike
Do rooms on different floors look very similar? Then the app can sometimes choose the wrong floor. In that case, create a NaviZone for these rooms on each floor and switch on Floor risk.
Does the app determine someone’s position in such a zone? Then the app first asks whether the floor is correct. The user confirms this, or chooses the correct floor themselves. This way, the user always follows the right route.
5.1.3 Connections between floors
With a vertical connection, you tell the app how a user goes from one floor to another. For example, by stairs, lift or escalator. The app uses this for the route and for the spoken instructions.
Users can choose in the app how they go to another floor. For example, Stairs only or Escalator preferred. This only works well if you set up the connections correctly here.
Before you start
You can only choose POIs with one of these words in the name of the POI type: elevator, lift, stair, escalator or ramp. So first create a POI type with such a name. See chapter 3.
Creating a connection
Open Modules > NaviGuide > Navi Vertical Connections.
Choose the type: Elevator (lift), Stairs, Escalator or Ramp.
Choose the direction: Up (upwards only), Down (downwards only) or Both (both ways). An escalator that only goes up therefore gets Up.
Click Pick on map and choose at least 2 POIs. For example, one at the bottom step and one at the top step.
Click Save.
Are the POIs of a connection directly above each other, as with a lift? Then you see a marker with the name of the floor at each POI. Hold your mouse over it. You will then see all the floors of this connection.
5.2 Messages at staircases
The app recognises stairs and lifts automatically. To do this, the app looks at the POI type and at the type under Navi Vertical Connections. See 5.1.3. The app then gives a standard message, such as: “Take the stairs down to [floor]”.
Sometimes extra information is needed, for example with a small step on the same floor. With three NaviZones, you then add an extra message.
For stairs on the same floor:
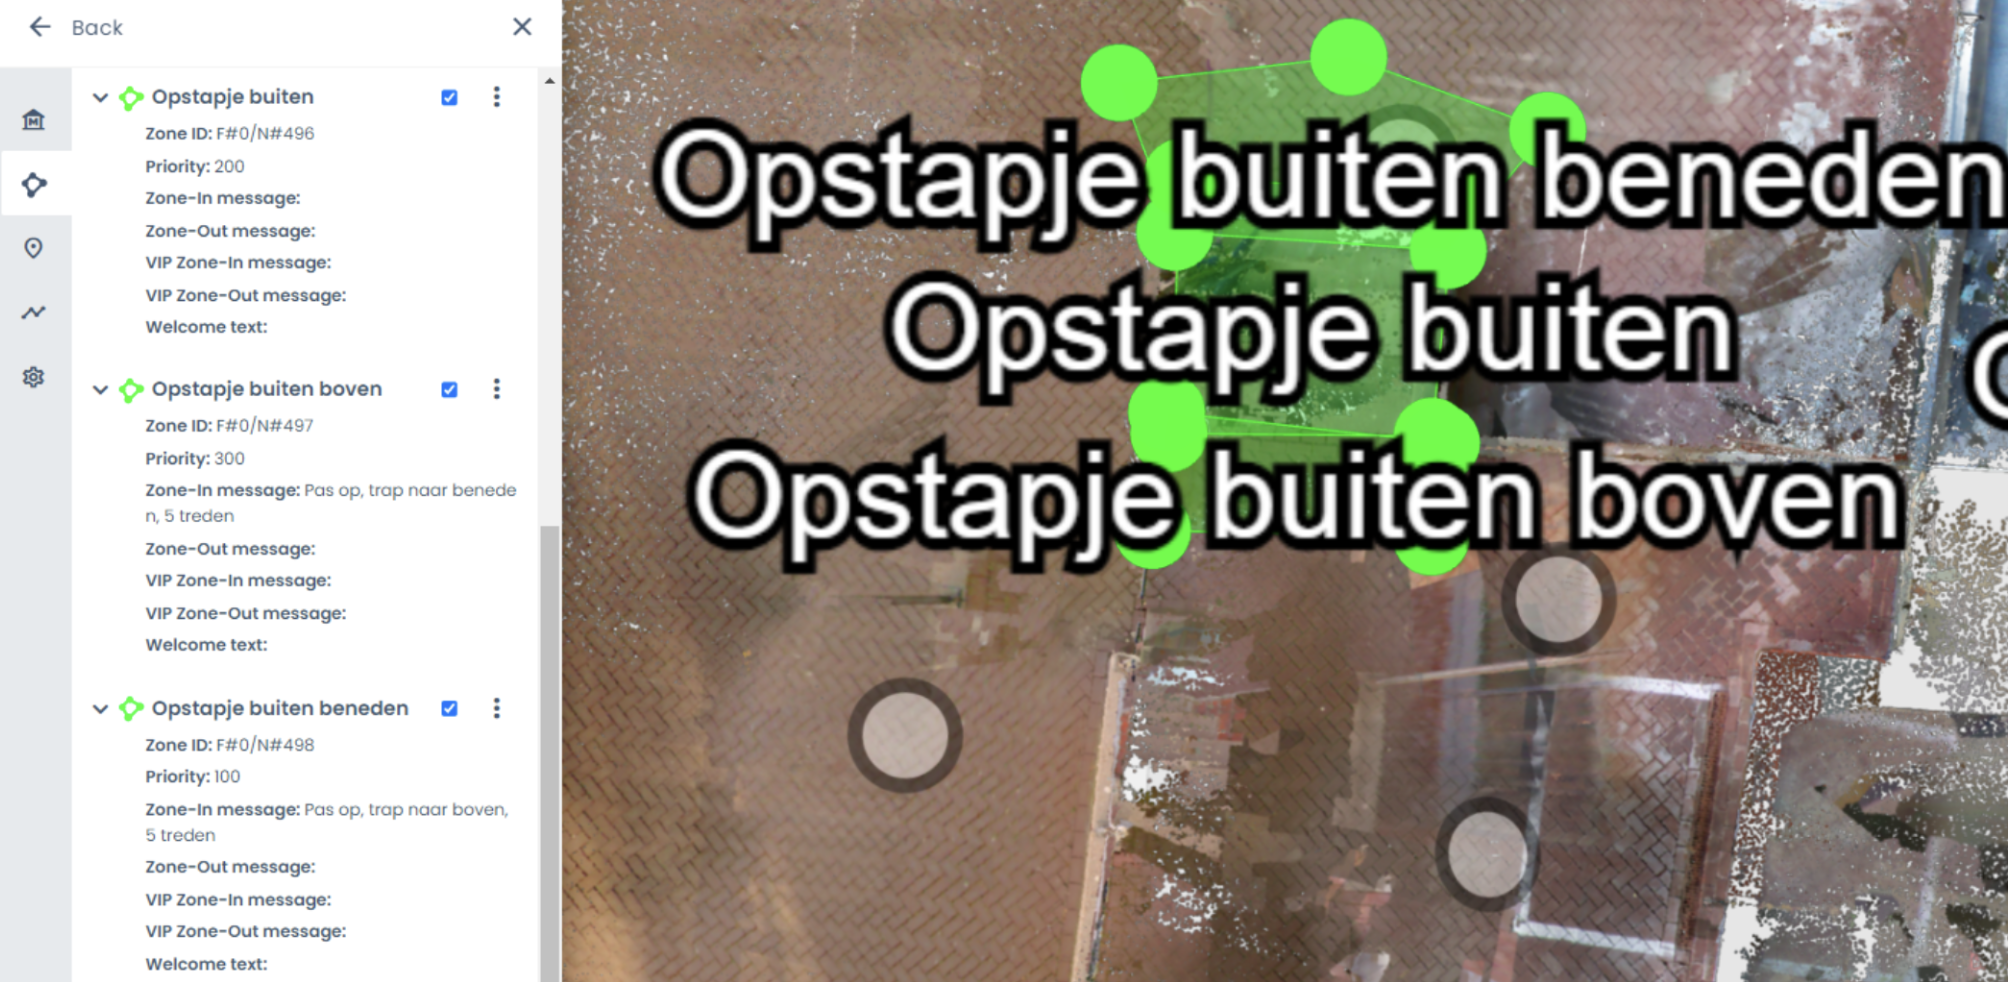
Place a NaviZone on the outline of the staircase. Give the zone a name, such as “Small staircase west”, and enter the number 200 at Priority. Click Save.
At the bottom of the zone you have just created, place a new NaviZone. This serves as an entry and exit zone. To keep an overview, give this zone the same title and add: bottom. In our example: “Small staircase west bottom”
Set the Priority of this zone to 100 and type the message that you want to be spoken in Zone-in message. For example: “Caution, small step, 5 steps”. Click Save.
At the top of the NaviZone “Small staircase west”, place a new zone. Give it the same title and add: top.
Set the Priority of this zone to 300 and type the message that you want to be spoken in Zone-in message. Click Save. As soon as the user walks through the area “Small staircase west bottom”, the Zone-in message will only play here.
Example of using stairs on the same floor
6. WELCOME INFORMATION
When a user opens a location, they can read the welcome information or have it read aloud. To do this, they tap the name of the location.
You change the welcome information via Modules > NaviGuide > Welcome information. Click the pencil to edit the text. Fill in the text for all the languages of your location.
6.1 Title and content
In the title, you enter something suitable, such as: “Welcome to [your location]!” This title will be shown at the top of the welcome information in the app.
Below that follows the written information about the location and the building. This can be instructions and descriptions, but also visual aspects, such as the size, the materials used, walking routes, entrances and exits, etc.
6.2 Images and alt text
You can add a maximum of four images. Click an empty box to upload an image. Give each image an alternative text, in all the languages of your location.
A screen reader, such as VoiceOver on iPhone or TalkBack on Android, reads the alternative text aloud. This way, someone who cannot see the image also knows what is on it.
Briefly describe what can be seen in the image and why it matters. For example: “Main entrance with a revolving door, with the information desk on the right.” Do not start with “Image of”, as the screen reader already says that.
7. NaviGuide settings
Here you set how the app works at your location. Go to Modules > NaviGuide > Settings.
7.1 View distance
This setting belongs to the Explore function in the app. You decide how far away POIs can still be seen. By default, this is 20 metres.
This value takes priority over the user’s setting. If you leave the field empty, the last saved value stays in place.
Are your POIs close together? Then choose a low value, for example 10 metres. Are they far apart? Then choose, for example, 30 metres.
7.2 Elevator radius
Within this distance, a notification appears in the app to take the lift. Does your building mostly have small lifts? Then use 1 metre. Are the lifts bigger? Then choose 1.5 to 2.5 metres.
7.3 Reaching radius
This distance determines how close the user has to be to the destination before the app says they have arrived. By default, this is 1 metre. Are your POIs close together? Then make it smaller, for example 0.7 metres.
7.4 Localization accuracy
This number determines how closely the camera image has to match the scan before the app knows where someone is. By default, this is 0.65 (65%).
Do many rooms in your building look alike? Then lower it to 0.55 (55%). Are all the rooms very different? Then you can raise it to 0.85 (85%).
7.5 Light enhancer
With this setting, the app uses three photos at the same time to determine someone’s position.
Units Choose whether distances in the app are given in metres (Metric) or in feet and yards (Imperial).
Help location
Users can tap the Help button in the app. The app then offers a route to a help point, for example the information desk. Here you choose which POI is that help point. Click the field and choose the POI.
This works from app version 3.2.1 on iPhone and version 0.4.6 on Android.
Turn angle margin
As long as the user is walking in the right direction, the phone vibrates. If they stray too far from the route, the vibration stops. That way, they know they need to correct their course. You can compare this to a white cane on a guide line: as long as you feel the line, you are walking the right way.
With Turn angle margin, you decide how many degrees the user may deviate before the vibration stops. Choose Default or a value from 5° to 50°, in steps of 5°.
Do you choose a small value? Then the vibration stops at even a small deviation. The guidance is then very precise. Do you choose a large value? Then the user has more room before the vibration stops.
7.5 Group categories
With this, you decide the order of the main categories in the app. Does your location consist of several buildings? Then you can also organise the categories per building. Read how this works in 3.2.
8. Tips and tricks
A few more tips to make everything work as well as possible.
8.1 NavGraph
With the key combination Shift + ?, an overview of keyboard shortcuts appears.
Nodes can also be created in the 3D environment by using the right mouse button in the panorama photo.
Every node has a Z-level. This means that they can differ in height in relation to floor level. Check that the points have the correct Z-level to prevent problems.
Check that there are no nodes that are connected to each other through walls.
For stairs and lifts: connect the nodes on both floors to each other. The app also recognises the type of connection from the POI type and from Navi Vertical Connections. See 5.1.3.
A node can also be deleted by selecting it and pressing the backspace key.
8.2 POI’s and NaviPoints
First think about the structure of the categorisation, and only then create the POIs. This saves you a lot of time and thought.
Left-click to adjust the POI and right-click for more options, such as adding written content (if the module is available).
A POI can only be created in the 3D view.
Place the POI just in front of the desired destination, so that the user can always reach the final destination.
A NaviPoint can only be created once a POI has been created in the surroundings.
A NaviPoint can act as both a warning and a destination.
8.3 Testing routes
Set up a route easily by right-clicking on a desired location in the 2D or 3D environment. Then click Route from here in the window to set the starting position.
Do the same at the desired final destination and click Route to here.
The system calculates the fastest route. This way, you can quickly see whether the nodes have been placed correctly and make changes if necessary.
9. OPTIONAL MODULE: VISITOR EXPERIENCE
This module is a major addition for POIs intended for sights or activities. With three text fields (general information, audio description and instruction), information can be given at a POI about what there is to see and do. The user can read the texts in the app or have them played.
9.1 Adding written content to a POI
Open Modules > NaviGuide > Museum Content.
You now see an overview of all POIs. With the eye icon, you switch between three views: all POIs, only POIs with museum content, or only POIs without museum content.
Right-click the POI and select Create/edit Museum Content.
Enter the text in the languages you want. The user can choose Dutch, English and German. So you can enter these languages.
General information: what is there to see or do here?
Audio description: specifications, for example: What is it made of? How big is the object?
Instructions: if an action can be carried out, it is described here. For example: What can I do with this object? How do I operate it?
Once all the texts have been entered for each language, click Save and they are saved.
9.2 URL-tags
If you want to add some extra information at the destination, such as a web page, you can add it with URL tags. This can be added under each text field.
Click the ‘Add’ button and a new window opens.
Under ‘Tag’, enter a short title of no more than 15 characters.
Under ‘Link’, enter the web page.
Give the tag a colour. The tag is shown in the app. If you have added several tags, you can organise them by colour.
Click ‘Save’ to add the tag.
Click the tag you added to edit it.
Click the cross to delete the tag.
10. OPTIONAL MODULE: Tours
This module is part of the Visitor Experience module. You use it to create a tour past POIs with information. You can read how to add information to a POI in chapter 9.
10.1 Creating a tour
Open Modules > NaviGuide > Tours.
You now see an overview of all tours.
Click + to create a tour. Do you want to edit a tour? Click the three dots next to the tour and choose Edit.
A window called ‘Create tour’ opens in the middle of the screen.
Under ‘Name’, enter the title of the tour. Under ‘Description’, enter a short description.
Under the heading ‘Select POI’s’, you can see all POIs that have content. To add a POI to the tour, click the checkbox behind the POI.
Click ‘Save’.
Now that the tour has been created and the POIs have been selected, you can set the walking order. Click a POI in the list, hold it and move the mouse up or down.
Below the POIs in the list, you can see a ‘+’ icon. Use it to add and remove POIs with content.
You can also upload an image via ‘Upload thumbnail’. This image is shown in the app. If nothing is uploaded, the app shows a default eZwayZ image.
© Atsence B.V. All Rights Reserved | General Terms and Conditions